Image optimization should be integrated in your team’s workflow and processes.
We’ve outlined the importance and basics of image optimization for designers in another article.
Now, discover more strategies to make image optimization an integrated process in your project.
Overview
Just like how “web performance” shouldn’t just be a singular task, image optimization needs to be part of your workflow and consistently monitored.
While it’s important to deliver optimized image assets to your development team, there are other things your team can look into to take your image optimization game to the next level.
We cover some of these below:
1) Lazy Load Below-the-fold Images
Lazy loading offscreen images is an effective optimization technique to speed up your page and is considered an industry best-practice for web performance.
Normally, your visitor’s browser spends time loading all the images on your page, including ones that aren’t needed during the initial page load.
When you lazy load below-the-fold images, your visitor’s browser only downloads the images that are actually needed for display in the viewport. The images that are below the viewport will only be loaded as the user’s viewport (the area rendered on the screen) approaches the image.
Lazy loading can be implemented in multiple ways (e.g., Native lazy loading, CMS Plugins, JavaScript). Talk to your development team to find the most suitable way to implement lazy loading on your site.
Keep in mind that only below the-fold images should be lazy loaded. Any image that appears in the viewport (or any image that visitors will immediately see during initial page load) should be excluded from lazy loading as that may delay your initial page load (i.e., Don’t lazy load the Largest Contentful Paint (LCP) image).
2) Image CDNs
Image CDNs are services that specialize in the transformation, optimization, and delivery of images. They can handle your images in a number of ways, such as:
- Compressing images for reduced file sizes.
- Resizing, cropping, and trimming images to the appropriate display.
- Converting images to more optimal formats (e.g., WebP).
- Serving images via a global CDN for improved latency.
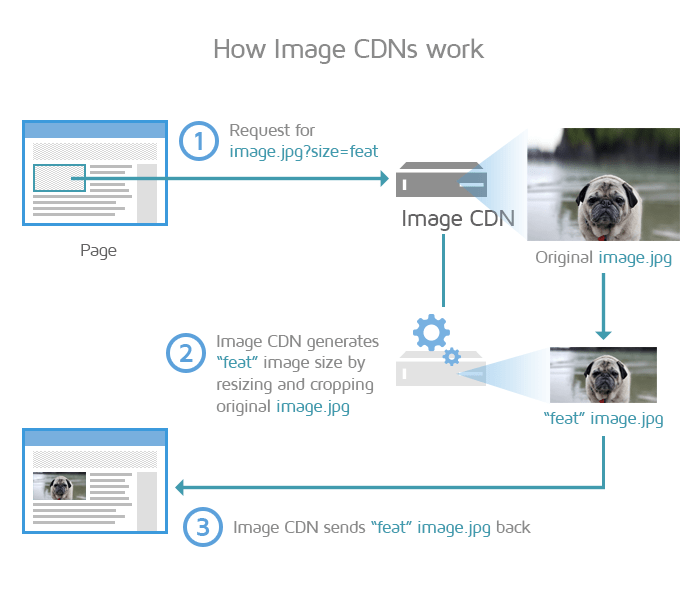
By using an Image CDN, you can ensure that your images are optimally compressed, resized to the visitor’s viewport, and served from the closest geographic location to your visitor, all of which results in a faster overall page load.
Image CDNs simplify your workflow as they can handle all things image-related on your production websites.
Here are a few things to consider before deciding to use an Image CDN:
- Depending on which Image CDN you use, you may incur an extra cost.
- Image CDNs cache your content – if you update content with the same URL, you may find the content being cached on your CDN service for longer than you intended.
3) Image Optimization Plugins (if Using WordPress or Other CMS)
WordPress (and other CMS) users can utilize image optimization plugins to handle many of the image optimization techniques discussed above.
There are many different kinds of general optimization plugins available that also provide some image optimization features:
- WP Rocket offers lazy-loading in addition to power caching and file optimization features.
- Imagify offers bulk and on-upload image optimization, and even WebP image delivery.
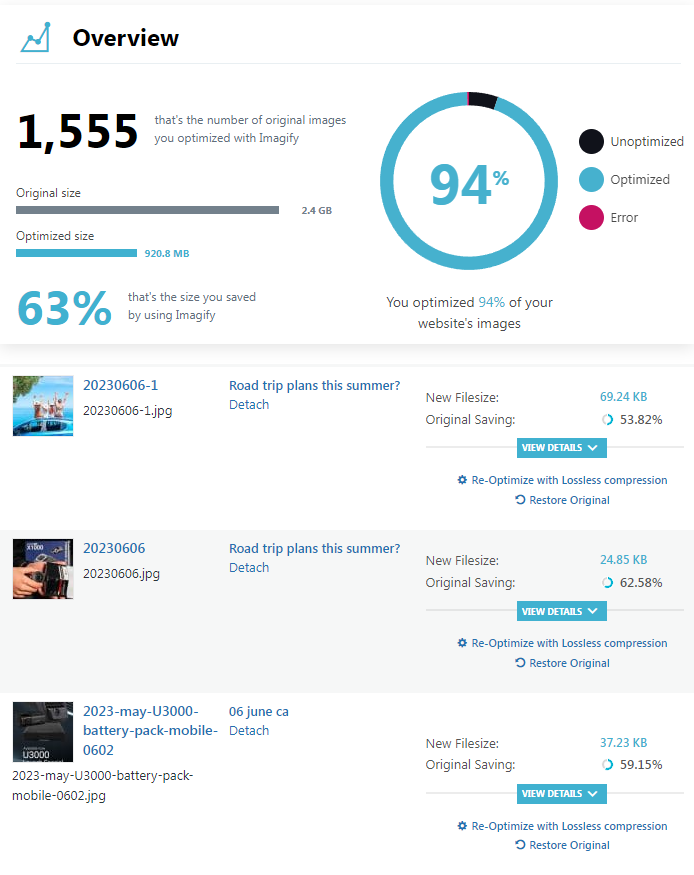
These plugins are quite light-weight, easy to configure, and are often good value as they can help simplify your image optimization workflow.
Similar to CDNs, keep in mind that you may incur an additional cost for these plugins, depending on the features offered and platform used.
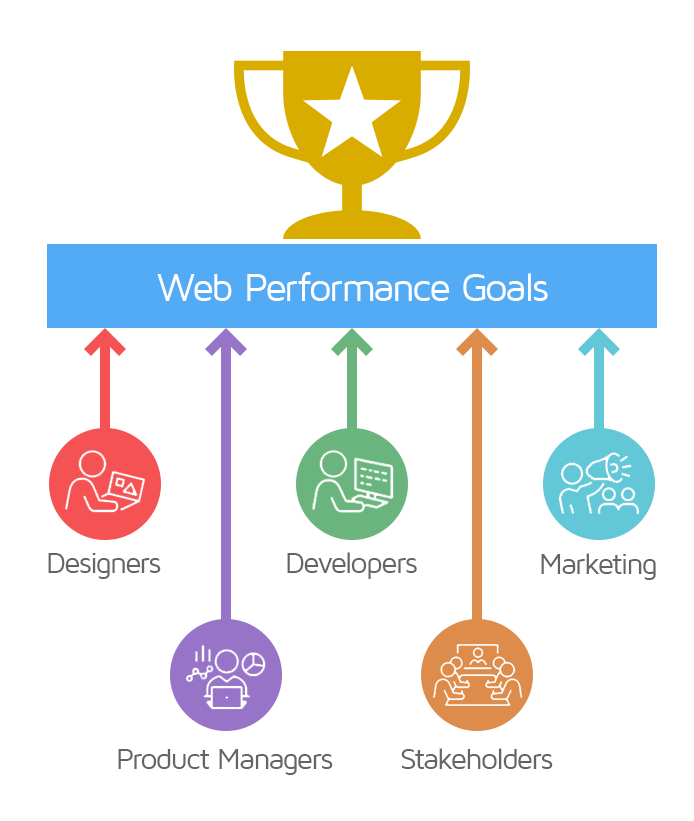
Building a Performance Culture
We’ve previously talked about why designers should care about performance.
In an increasingly digital world, organizations that embrace a performance-oriented culture have a better chance of being successful.
Hence, web performance shouldn’t just be a single item on a checklist to tick off, rather it should be a priority for the whole team/organization as we explain below.
Why is Building a Performance Culture Important?
As stated before, a fast website is a key step towards improving all manner of metrics:
- Increased user engagement
- Increased website conversions
- Increased pages per visit
- Reduced bounces
- Reduced network/bandwidth costs
- Reduced data/storage costs
…in addition, its importance to search engines is also something you shouldn’t ignore.
Building a performance culture is beneficial for all stakeholders, and it can start with designers.
A performance culture can keep a mindset to place a speedy user experience a top priority throughout the project process.
Discuss with your team the possibility of becoming performance-oriented as its benefits are there for all to see. We elaborate on this below.
How to Build a Performance Culture?
There are many approaches to a performance culture – from basic to very mature.
We’ve outlined a basic guide below on how to get started with building a culture that prioritizes performance.
Step 1) Generate awareness of the importance of web performance
This is naturally the first step towards building a performance culture.
Some good starting points are:
- Educating your team on how good performance impacts the user experience and business goals.
- Sharing statistics and case studies on how other companies benefitted from optimizing performance.
Here are some reasons to help make your case:

You can find more case studies on WPO Stats demonstrating the impact of web performance optimization (WPO) on user experience and business metrics.
Get your team to buy into the idea that optimized web performance is a worthy goal to strive for.
Step 2) Determine the objectives that matter to you
A key step towards building a performance culture (especially if you’re unsure how to start) is to determine what objectives matter the most for your team.
What is important to you?
| To see a certain element of content as fast as possible? | To have a rapid server response time? |
| To obtain “visual completeness” of your entire page as fast as possible? | To have the user interact with the page as fast as possible? |
| To have a fast mobile experience? | …any combination of the above? |
Most of these objectives can be mapped to metric and audits like LCP, TTFB, Speed Index, and “Reduce JavaScript execution time“.
You can make a list of these objectives and their equivalent metrics/audits using our Recommendations section.
Step 3) Set performance goals
Now that you have your objectives, you can set goals for improving metrics that align with your business objectives.
For example:
|
To see a certain element of content as fast as possible? Goal: Largest Contentful Paint (LCP) less than 1s |
To have a rapid server response time? Goal: Time to First Byte (TTFB) less than 600ms |
|
To obtain “visual completeness” of your entire page as fast as possible? Goal: Speed Index less than 1.5s |
To have the user interact with the page as fast as possible? Goal: Reduce Total Blocking Time (TBT) by 50% |
|
To have a fast mobile experience? Goal: GTmetrix Grade greater than C for Apple iPhone 13/13 Pro/13 Pro Max on LTE |
…other performance goals? |
Just make sure to set performance goals that are attainable.
While it’s tempting to aspire for A’s and 100% scores everywhere, you also need to work within your capabilities, timelines, and budget.
Read more on our “Don’t chase perfect scores” article.
Step 4) Establish a benchmark
Having chosen the metrics and set your goals, you’ll need to measure them to see where you currently stand and what improvements are needed.
GTmetrix can help you measure these key metrics so that you can establish a baseline for your work.
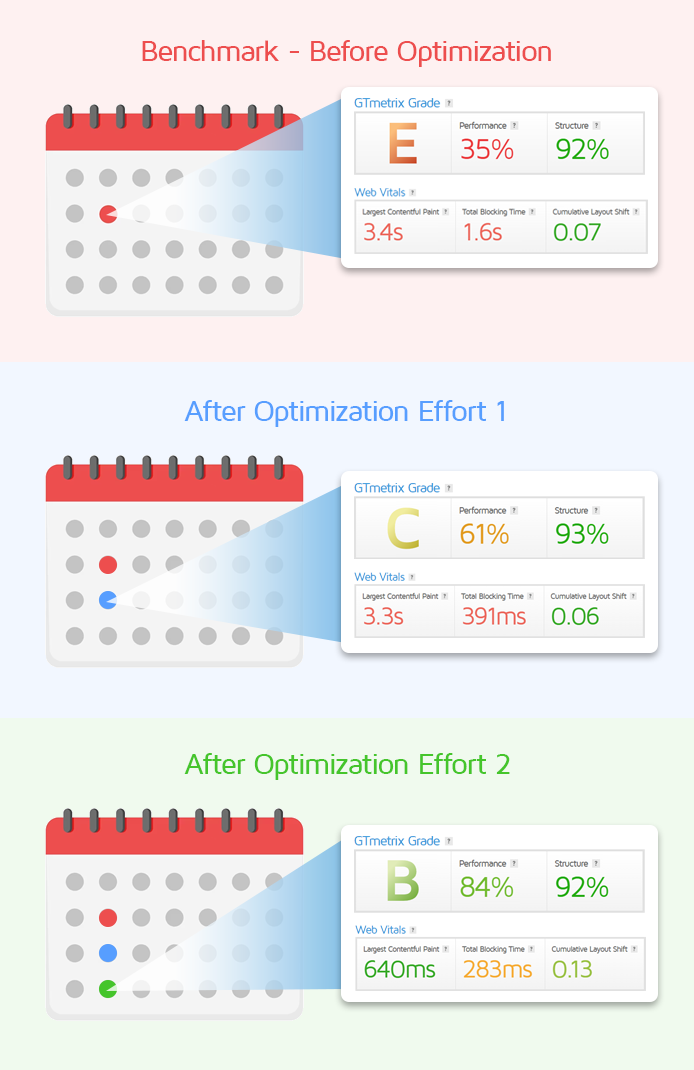
We suggest measuring these metrics under different test conditions (e.g., location, device, connection speed) so that you can optimize your media for all audiences across different regions.
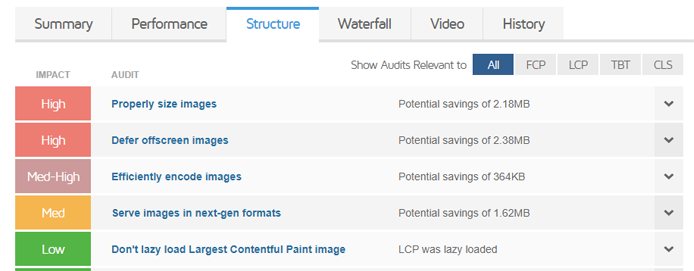
Specific to designers, there are several image-based audits that can help you score some key wins.
Step 5) Embed web performance techniques into your workflow
We’ve covered several web performance techniques specific to designers.
Incorporating them directly into your workflow ensures you have an optimized site from the beginning, and don’t need to resort to lengthy reworks and rebuilds later on.

Depending on the nature of the site, you may need to frequently change your images and videos, which is much easier to do when you already have an optimized workflow.
Step 6) Automate performance tracking for maintenance
Your performance journey doesn’t stop once you’ve hit your goals.
While your website may be optimized for performance today, it might not be the case in the future as website content tends to change over time.
Keeping track of your performance can help ensure your present, as well as future optimization efforts continue to bear fruit.
GTmetrix can automate this process for you by monitoring your webpages at your desired frequency.
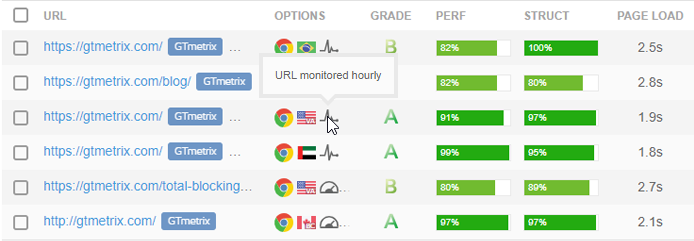
GTmetrix alerts can notify you if your performance drops below your specified thresholds, allowing you to take action before it starts to impact your site/business metrics.
Step 7) Routinely review performance and recognize success
Once you’ve set up your performance optimization workflows and integrated strategies to ensure continuous optimization throughout your project development, it’s important to review results over time to see how you’re doing.
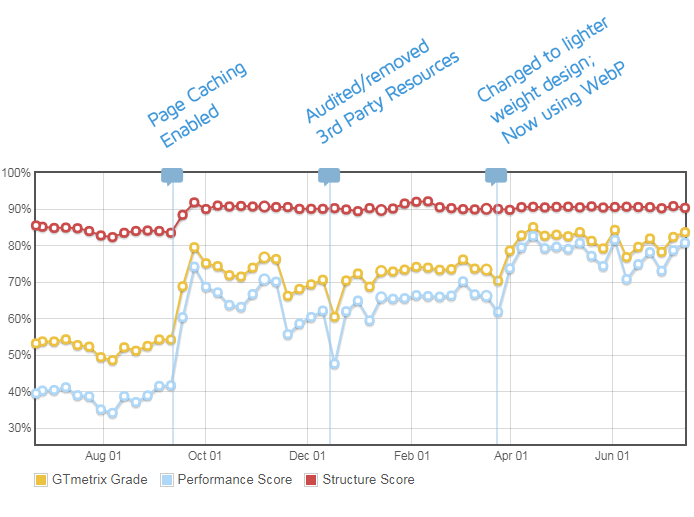
Recognize wins when performance improvements are clear and try corroborating them with corresponding KPIs like conversions, bounce rates, engagement levels, etc.
These reviews can help you solidify the relationship between performance and business goals and give you more reason to embrace a performance culture moving forward.
Here are a few case studies from other design agencies who used GTmetrix to foster a performance culture:
- Chromatix Web Design: Agency Insight On How To Catch The Most Common Website Issues With GTmetrix
- Yael Consulting: Increase Google Ads Conversion Rates with GTmetrix
Summary
It’s important for designers to deliver optimized image assets to your development team. Having said that, there are also other things your team can look into to take your image optimization game to the next level.
We’ve outlined some of these strategies in this guide, and also highlighted why and how you should build a performance culture in your organization.
If you’re a designer, give this guide a try and see how GTmetrix can help improve your site performance dramatically!
Test with different countries, speeds and options
Get access to more Test Locations, Analysis Options and Connection Speeds!
Sign up for a Basic GTmetrix account and see how your site performs in more scenarios – It’s FREE!
Get Mobile Testing, Premium Locations, and more
Get more On-Demand Tests, Monitored Slots and Premium Test Locations along with Hourly testing with a GTmetrix PRO plan.
Upgrade to GTmetrix PRO and see how your site performs in all scenarios.