PostgreSQL® Features and Use Cases
PostgreSQL is an open-source Object-relational Database Management System (DBMS). It’s an advanced database management and analysis system that’s mainly used for eCommerce platforms, payment transactions, and various data warehousing solutions. It has been around for over 30 years and is regularly updated every year, supports various SQL functions like triggers, user-defined types and functions, sub-queries, etc.
PostgreSQL is one of the world’s most advanced open source databases. It is suitable for several production and development use cases. It provides numerous advantages such as enhanced partitioning and query performance (particularly over large datasets), B-tree enhancements for optimal space utilization, multi-column most common value (MCV) statistics, common table expressions with query inlining and checksum control.
A few words about Ubuntu 20.04 on DigitalOcean
Ubuntu is a popular open-source desktop operating system. Ubuntu 20.04 includes numerous cutting-edge features, such as a tool to manage ZFS snapshots, a major kernel bump, and security improvements. The DigitalOcean cloud platform provides a robust infrastructure and global availability to develop, manage and scale applications in the cloud. With its compute, storage, databases, and networking products, developers can build web and mobile applications, streaming services, games, SaaS solutions, and more. Offering features like shared private networking, one-click DevOps tools, and SSD hard drives, DigitalOcean is a flexible, secure, and simple choice for mission-critical solutions.
This tutorial provides detailed instructions on how to install PostgreSQL on DigitalOcean Ubuntu 20.04. Without further ado, let’s get started!
Pre-requisites to Install PostgreSQL
Before we dive into the actual installation of PostgreSQL 12 on DigitalOcean Ubuntu 20.04, you need to make sure your system meets the following prerequisites.
- The server should have at least a basic UFW firewall to ensure that only connections to certain services are allowed.
- The system should be updated for a new server instance and rebooted. To do that, use the following commands:
sudo apt update && sudo apt upgrade –ysudo reboot
Installing PostgreSQL on Ubuntu 20.04 DigitalOcean
You can install PostgreSQL 12 using Ubuntu 20.04 official/default repositories using the apt package manager system. Before doing this, you should already have refreshed your server’s local package index (see prerequisites above).
The repository contains different packages (including 3rd-party add-ons) such as:
- postgresql-client
- postgresql
- libpq-dev
- postgresql-server-dev
- pgadmin packages
Then install the complete PostgreSQL 12 package along with the postgresql-contrib module that provides additional utilities and functionality. This can be installed by running the following command:
sudo apt install postgresql postgresql-contrib –y
Then start the PostgreSQL service at system reboot by running the following command:
sudo systemctl start postgresql
To automatically start the PostgreSQL service upon system startup, run:
sudo systemctl enable postgresql
Verify that the PostgreSQL service is running as expected by running systemctl status postgresql:
sudo systemctl status postgresql
This should return the status of the PostgreSQL service and should show active, similar to the screenshot below.

Customizing PostgreSQL Initialization
After the installation, a database cluster can be created with the help of the initdb command. The initdb command must be run from within the database user, and not from the root user. The root user can create an empty directory which can be chowned (change owner command) by the postgres user. This directory will contain the data as a template, which will be copied to all the databases by default. From the postgres user, the following command can be invoked with the appropriate option and directory name.
initdb [option...] [ --pgdata | -D ] directory
The initdb command can be run as an authenticated user with the different flags to create a db template in a given directory.
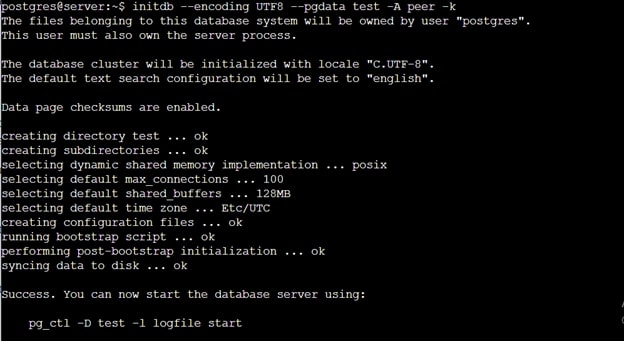
Provided below is a list of specific flags as seen in the screenshot above:
--encoding UTF8(it can be any based on the Locale).- Encoding flag sets the encoding of the database template. All the databases created using that template will also use the same encoding method unless specified separately. There are many encoding methods available for different languages.
--pgdata test(this flag creates a directory named “test” to store the database data).- Specifies the directory where the database cluster saves its data.
-A peer(this specifies the authentication method used in the pg_hba.conf file).- Specifies the default authentication method for local users used in pg_hba.conf (host and local lines). initdb will prepopulate pg_hba.conf entries using the specified authentication method for non-replication as well as replication connections.
-k(uses data-checksum to check I/O errors)- Specifies the data-checksum on all the data pages to detect the corruption of the I/O system. However, this slows down the database processing speed).
Securing your PostgreSQL Database
During the installation, a new user named postgres is created automatically by default. This user has full system privileges, so it’s important to secure the user account with a strong password.
sudo passwd postgres
Now switch to the postgres user account. The user should have sudo privileges.
sudo su – postgres
The PostgreSQL version can be confirmed by running
psql -c "SELECT version();"

To change the password of postgres user use command:
psql -c "ALTER USER postgres WITH PASSWORD 'MyNewPassword'";
Note: This password only applies when the postgres user connects to PostgreSQL over the network.
To access Postgres database you can log in to the PostgreSQL database with:
psql postgres
By default, PostgreSQL does not require password authentication from local system users to access the database. This is called “peer authentication”. However, password authentication can be enabled from within the pg_hba.conf file.
To edit this pg_hba.conf file, use \q command to exit from the postgres shell and to enter into the Linux shell. From inside the Linux shell, edit the pg_hba.conf file. Make sure you take a backup before editing the file.
sudo cp /etc/postgresql/12/main/pg_hba.conf /etc/postgresql/12/main/pg_hba.conf.bak
Then edit the file using nano editor,
nano /etc/postgresql/12/main/pg_hba.conf
Find the local line under “Unix domain socket connections only” and change the METHOD attribute from peer to md5.

Reload the PostgreSQL service to apply the new settings.
sudo systemctl reload postgresql
Please note here that there are two users with the name postgres; one is the Linux user to connect and access the Database, and the other is the database user that’s used to perform administrative roles inside the database.
Configuring your PostgreSQL Database
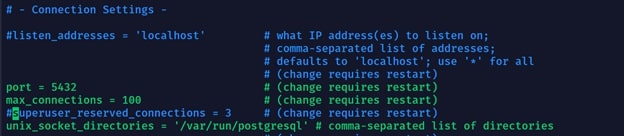
PostgreSQL can be configured manually for listen addresses and ports by changing the required parameters in the postgresql.conf file.
By default, the PostgreSQL port 5432 is used and listens on localhost. This can be changed by editing the configuration file.
sudo nano /etc/postgresql/12/main/postgresql.conf
The service will be restarted after making any changes.
sudo systemctl restart postgresql
Creating a New Role in PostgreSQL 12
Authentication and authorization in PostgreSQL 12 happen via the “role” concept. Here, role is a flexible term that refers to both users and groups.
Log in to the postgres user by using this following command:
sudo su postgres
New roles can be created interactively from the command line with the createrole –interactive command. Here, the use of the –interactive flag will create a prompt for the name of the new role, and whether this role should be assigned superuser permissions.
A new user can be created with a new role outside of the user postgresql shell as:
createuser –interactive
The output of the new user command should look something like this.

Creating and Deleting a Database in your PostgreSQL Server
In PostgreSQL 12, when a new role is created, a new database with the same name must exist as the role tries to connect with the database by default. So as in the previous section, where the user liam is created, a database with that name can be created by using the following command:
createdb liam
Within PostgreSQL 12, there are multiple paths for creating databases as required:
- When logged in from the postgres account:
postgres@server:~$ createdb liam - Use
sudo,sudo –u postgres created liam
To delete the database, we can use
dropdb liam
Opening a Postgres Prompt with the New Role
A Linux user with the same name as the Postgres database and role can be created to log in with ident-based authentication.
A Linux user can be created (if one does not exist already) from the command line by typing:
sudo adduser noah
After the user is created, it can be logged in by using the following command;
sudo -u noah psql
The current database and user information can be accessed by using;
\conninfo

PostgreSQL Management
Creating and Deleting Tables
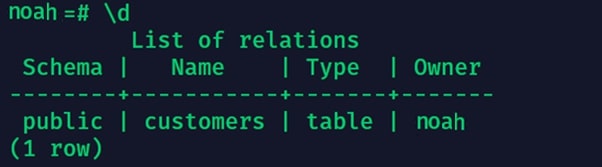
The SQL command CREATE TABLE can be used to create any table within a database. A list of columns and a data type for each column have to be specified in the command.
CREATE TABLE customers (customer_id int, first_name varchar(80), last_name varchar(80));
This command will create a table named “customers”. The first column will hold the Customer ID of the type integer. The second and third columns are of type character and will contain the first and last names of the customers with a maximum length of 80 characters.
This new table can be seen by typing \d.
The table can be deleted by typing:
DROP TABLE customers;
Inserting, Selecting, and Deleting Data in a Table
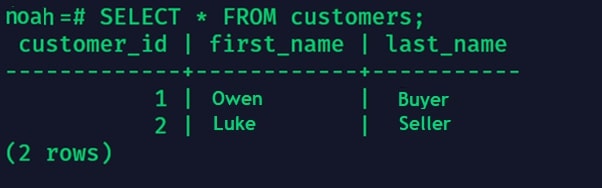
Data is added into the PostgreSQL tables in the form of rows. Each row represents a separate set of data. Data can be inserted into the row by using the INSERT INTO command. The command name is followed by the “table name” (in the following example, customers), the keyword VALUES, a list of values separated by a comma.
INSERT INTO customers VALUES (1, 'Owen', 'Buyer');
INSERT INTO customers VALUES (2, 'Luke', 'Seller');
Contents of the table can be viewed by using the SELECT command.
SELECT * FROM customers;
A row can be deleted by using the DELETE command. The WHERE keyword is used to select the rows conditionally.
DELETE FROM customers WHERE last_name = 'Seller';
To delete all the rows, type:
SELECT * FROM customers;
Adding and Dropping Columns from a Table
PostgreSQL 12 provides the ability to add or delete columns from the existing tables with ease.
The ALTER TABLE command is used along with the ADD keyword to add a column to an existing table. This field is set empty for the existing rows in the table.
ALTER TABLE customers ADD branch_id int;
The same command is used with the DROP keyword to delete the specified column from the table.
ALTER TABLE customers DROP first_name;
Updating Data in a Table
Apart from adding and deleting records inside a table, we can also modify them. This can be done by using the UPDATE command. We need to specify the columns that need to be edited with the new values.
UPDATE customers SET last_name= 'Buyer' WHERE customer_id = '1';
Considerations for Production Environment
PostgreSQL 12 can be used safely in a production environment. This database is so stable that one should have no issues implementing it on a large scale. For more information, please refer to our previous article here.
Conclusion
This tutorial showed you how to set up PostgreSQL 12 on a Ubuntu 20.04 server running on DigitalOcean. PostgreSQL 12 is a complex application with many new and advanced features, such as improved space management of standard B-tree indexes, and support for concurrent index rebuilding and covering index creation. Version 12 also supports inlined WITH queries and ICU-provided collations, improves partitioning, and provides a pluggable table storage interface to create and use different methods for table storage.
Now that you know the basics of setting up and using a PostgreSQL server, why not try out a managed alternative? With a managed service like ScaleGrid, you can complete the whole setup, installation and configuration process in the click of a button. Start your free 30-day trial today and see for yourself! No credit card is required and you can set up your very first database in a matter of minutes.
We have covered the installation basics here, and also provided some instructions for general database administration. We hope you found this guide useful.