
This blog post will introduce you to Fluent Bit 3.0 and some best practices for using it in your observability pipeline.
What is Fluent Bit?
Fluent Bit is a telemetry agent designed to receive data (logs, traces, and metrics), process or modify it, and export it to a destination. Fluent Bit can serve as a proxy before you send data to Dynatrace or similar. However, you can also use Fluent Bit as a processor because you can perform various actions on the data. Fluent Bit was designed to help you adjust your data and add the proper context, which can be helpful in the observability backend.
What’s the difference between Fluent Bit and Fluentd?
Fluent Bit and Fluentd were created for the same purpose: collecting and processing logs, traces, and metrics. However, Fluent Bit was designed to be lightweight, multi-threaded, and run on edge devices.
Fluent Bit was created before Kubernetes existed when Internet of Things (IoT) was a new buzzword. Unfortunately, their market prediction wasn’t correct; the cloud became more successful than IOT.
Learn more about configuring Fluent Bit to collect logs for your Kubernetes cluster and collecting logs with Fluentd.
What’s new in Fluent Bit 3.0
Fluent Bit recently released version 3.0, which offers a range of updates:
- HTTP/2 support: Fluentbit now supports HTTP/2, enabling efficient data transmission with Gzip compression for OpenTelemetry data, enhancing pipeline performance.
- New processors: Introducing new processors, including Metric Selector and Content Modifier, for selective data processing and metadata adjustment, improving data relevance and storage efficiency.
- SQL processor: Integration of SQL processing capabilities for precise data selection and routing, allowing users to filter logs and traces based on specific criteria for optimized backend storage.
- Enhanced filtering: Streamlined data collection with selective metrics inclusion/exclusion, efficient metadata adjustment, and precise data routing, ensuring only relevant data is transmitted to the observability backend.
- Scalability and efficiency: Improved scalability and performance enhancements, optimized compression, and efficient data routing contribute to a more streamlined and cost-effective observability solution with Fluentbit 3.0.
In the following paragraphs, we will introduce a few best practices, particularly when using Fluent Bit 3.0. If you’d like to learn more about the updates, don’t miss Henrik’s video: Fluent Bit 3.0 Observability: Elevating Logs, Metrics, and Traces!
Best practices for Fluent Bit 3.0
Here are some best practices for using Fluent Bit 3.0, as recommended by our internal expert, Henrik Rexed.
Understand what you want to accomplish
Before using Fluent Bit, you must clearly understand what you want to accomplish with your data. If you have logs, Fluent Bit is the right choice. For metrics, Fluent Bit has some limitations. And for traces, sampling won’t be possible. Be sure you can achieve what you want with Fluent Bit; otherwise, you might need to look into other options. Ask yourself, how much data should Fluent Bit process? Would it be better to send the data somewhere else, like Dynatrace, and let Grail process it?
Use the Expect plugin
Start small and test that you’re achieving what you expect by using the Expect plugin, a gatekeeper that helps your pipeline be more efficient by blocking content that doesn’t follow the rules you put in place.
Before reading the expected logs, you can either create a file with log data designed for testing or use the dummy input plugin that sends dummy data to the pipeline (see example below).
pipeline:

 inputs:

   - name: dummy

     dummy: '{"message": "custom dummy"}'

 outputs:

   - name: stdout

     match: '*'
Apply modifications directly at the source
Attaching the processor to the input or output sections allows you to apply modifications directly at the source, making you more efficient. Localized modifications are thus possible before logs go through the parser, which means you can:
- Make global rules
- Be more tactical
- Save CPU time
- Have a more robust and reliable pipeline
Processing at the source relieves pressure on the Fluent Bit agent.
Other types of modifications
Traces
It might be a rare use case, but if you want to obfuscate some traces, you can use the content_modifier. The content modifier can only be used for traces and logs, not metrics.
Metrics
Use the label processor to remove metrics, add them, and reduce cardinality and metric costs. The only thing missing is converting the metric (cumulative and delta).
Logs
The SQL processor makes your pipeline experience easier since you can use select to filter precisely which logs you want to change.
Understand the concept of tags
Your experience with Fluent Bit will improve if you learn how tags function, especially if you’ve never used Fluent before. Tags make routing possible and are set in the configuration of the input definitions. They can be used to apply specific operations only to specific data.
For example, you’ve ingested OpenTelemetry metrics, logs, and traces, so you might have:
Otlp.metricsOtlp.logs
Using the tag “metrics,” you can target just the otlp.metrics for certain operations.
There’s also a filter plugin called rewrite_tag that, as the name suggests, you can reuse to re-emit a record under a new tag.
Use the service section to check your pipeline’s health
In the service section, you can enable two crucial things: the Health_Check and the http_service. These help you get more insight into the health of your pipeline with Kubernetes. See the example below.
apiVersion: v1

kind: ConfigMap

metadata:

 annotations:

   meta.helm.sh/release-name: fluent-bit

   meta.helm.sh/release-namespace: fluentbit

 labels:

   app.kubernetes.io/instance: fluent-bit

   app.kubernetes.io/managed-by: Helm

   app.kubernetes.io/name: fluent-bit

   app.kubernetes.io/version: 2.2.1

   helm.sh/chart: fluent-bit-0.42.0

 name: fluent-bit

 namespace: fluentbit

data:

 custom_parsers.conf: |

   [PARSER]

       Name docker_no_time

       Format json

       Time_Keep Off

       Time_Key time

       Time_Format %Y-%m-%dT%H:%M:%S.%L

 fluent-bit.yaml: |

   service:

     http_server: "on"

     Health_Check: "on"


   pipeline:

     inputs:

       - name: tail

         path: /var/log/containers/*.log

         multiline.parser: docker, cri

         tag: kube.*

         mem_Buf_Limit: 5MB

         skip_Long_Lines: On

         processors:

           logs:

             - name: content_modifier

               action: insert

               key: k8s.cluster.name

               value: ${CLUSTERNAME}

             - name: content_modifier

               action: insert

               key: dt.kubernetes.cluster.id

               value: ${CLUSTER_ID}

             - name: content_modifier

               context: attributes

               action: upsert

               key: "agent"

               value: "fluentbitv3"


       - name: fluentbit_metrics

         tag:  metric.fluent

         scrape_interval: 2


     filters:


       - name: kubernetes

         match: kube.*

         merge_log: on

         keep_log: off

         k8s-logging.parser : on

         k8S-logging.exclude: on


       - name: nest

         match: kube.*

         operation: lift

         nested_under: kubernetes

         add_prefix :  kubernetes_

       - name: nest

         match: kube.*

         operation: lift

         nested_under: kubernetes_labels

       - name: modify

         match: kube.*

         rename:

           - log content

           - kubernetes_pod_name k8s.pod.name

           - kubernetes_namespace_name k8s.namespace.name

           - kubernetes_container_name k8S.container.name

           - kubernetes_pod_id k8s.pod.uid

         remove:

            - kubernetes_container_image

            - kubernetes_docker_id

            - kubernetes_annotations

            - kubernetes_host

            - time

            - kubernetes_container_hash


       - name: throttle

         match: "*"

         rate:     800

         window:   3

         print_Status: true

         interval: 30s


     outputs:


       - name: opentelemetry

         host: ${DT_ENDPOINT_HOST}

         port: 443

         match: "kube.*"

         metrics_uri: /api/v2/otlp/v1/metrics

         traces_uri:  /api/v2/otlp/v1/traces

         logs_uri: /api/v2/otlp/v1/logs

         log_response_payload: true

         tls:  On

         tls.verify: Off

         header:

           - Authorization Api-Token ${DT_API_TOKEN}

           - Content-type application/x-protobuf

       - name: prometheus_exporter

         match: metric.*

         host: 0.0.0.0

         port: 2021
Enabling the http_server also exposes many API endpoints.
Utilize Hot Reload to save time with changes
By default, any change you make requires an agent restart, which can be time-consuming. If you enable Hot Reload, an HTTP request is sent to reload Fluent Bit and read the pipeline files, which makes the whole process smoother. It’s particularly great if you’re in a bare metal environment.
Expose data for Prometheus with Fluent Bit Metrics
If you want to expose data from a Prometheus standpoint, use the Fluent Bit Metrics plugin, which asks Fluent Bit to become a Prometheus exporter. The plugin is excellent because it produces interesting metrics.
service:


   flush: 1


   log_level: info


pipeline:


   inputs:


       - name: fluentbit_metrics


         tag: internal_metrics


         scrape_interval: 2


   outputs:


       - name: prometheus_exporter


         match: internal_metrics


         host: 0.0.0.0


         port: 2021
Mind your memory and resources
When you modify your data and reject what you don’t need, a retry logic keeps the rejected data in memory. However, if too many exceptions exist, the Fluent Bit agent will become unstable and crash. So it’s important to regularly look at the stdout of Fluent Bit and remove the noise; otherwise, the logs may become unreliable.
In every input plugin for logs and traces, we see a (memory) buffer. Data can be ingested faster than it can be sent to its destination, which can create backpressure, leading to high memory consumption. Plan to avoid out-of-memory situations. By default, you have a storage type memory, but you may exceed this buffer limit if you have a lot of data. It’s crucial to finetune this memory buffer limit to avoid instability.
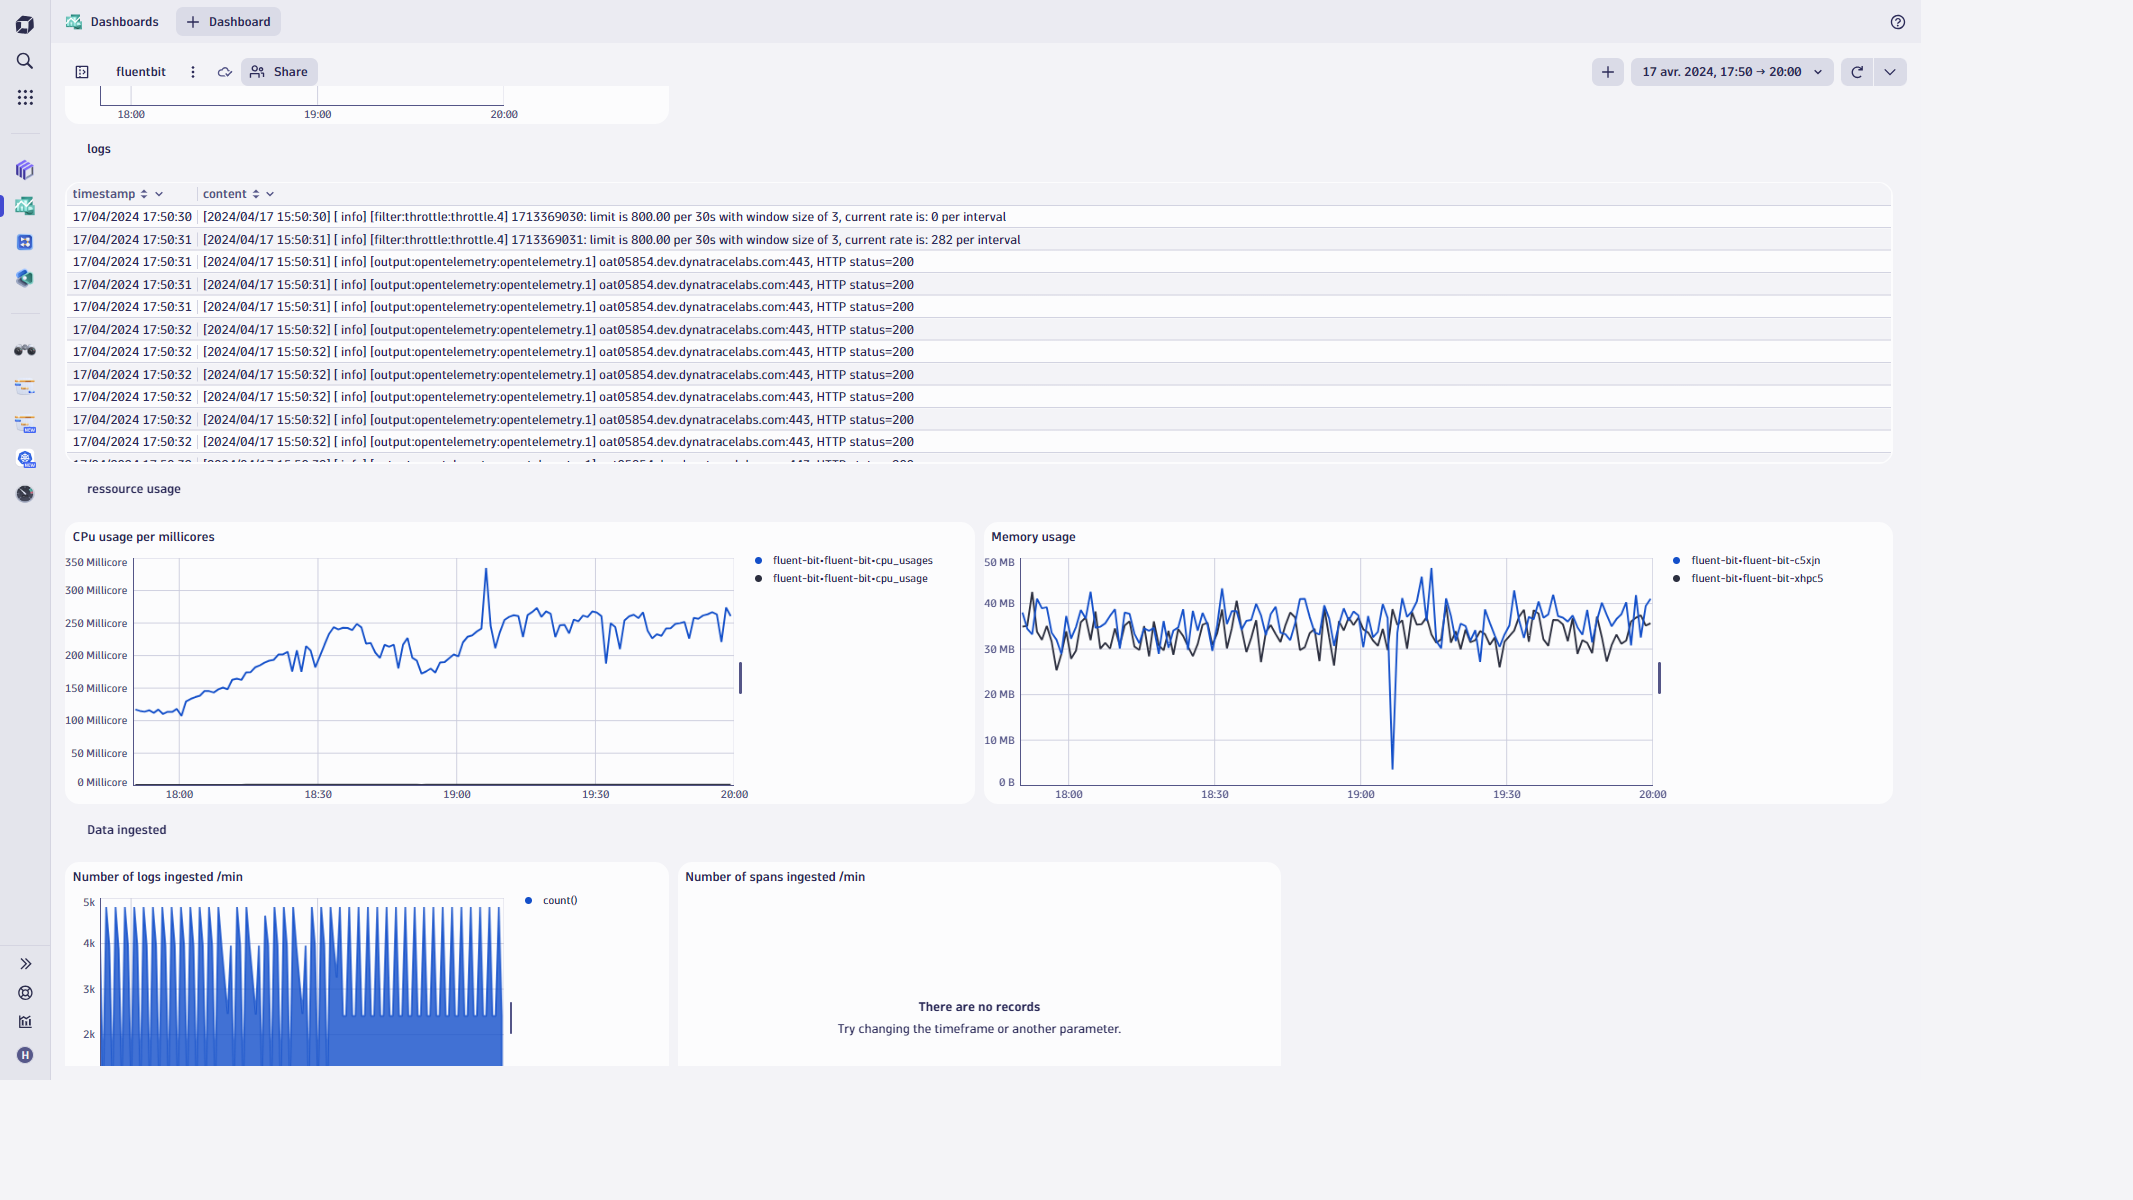
On a similar note, pay attention to the resource usage of the agent (CPU, behavior, throttling) and the pipeline metrics. Create a dashboard to see those metrics, as you can see in the example below from Dynatrace:
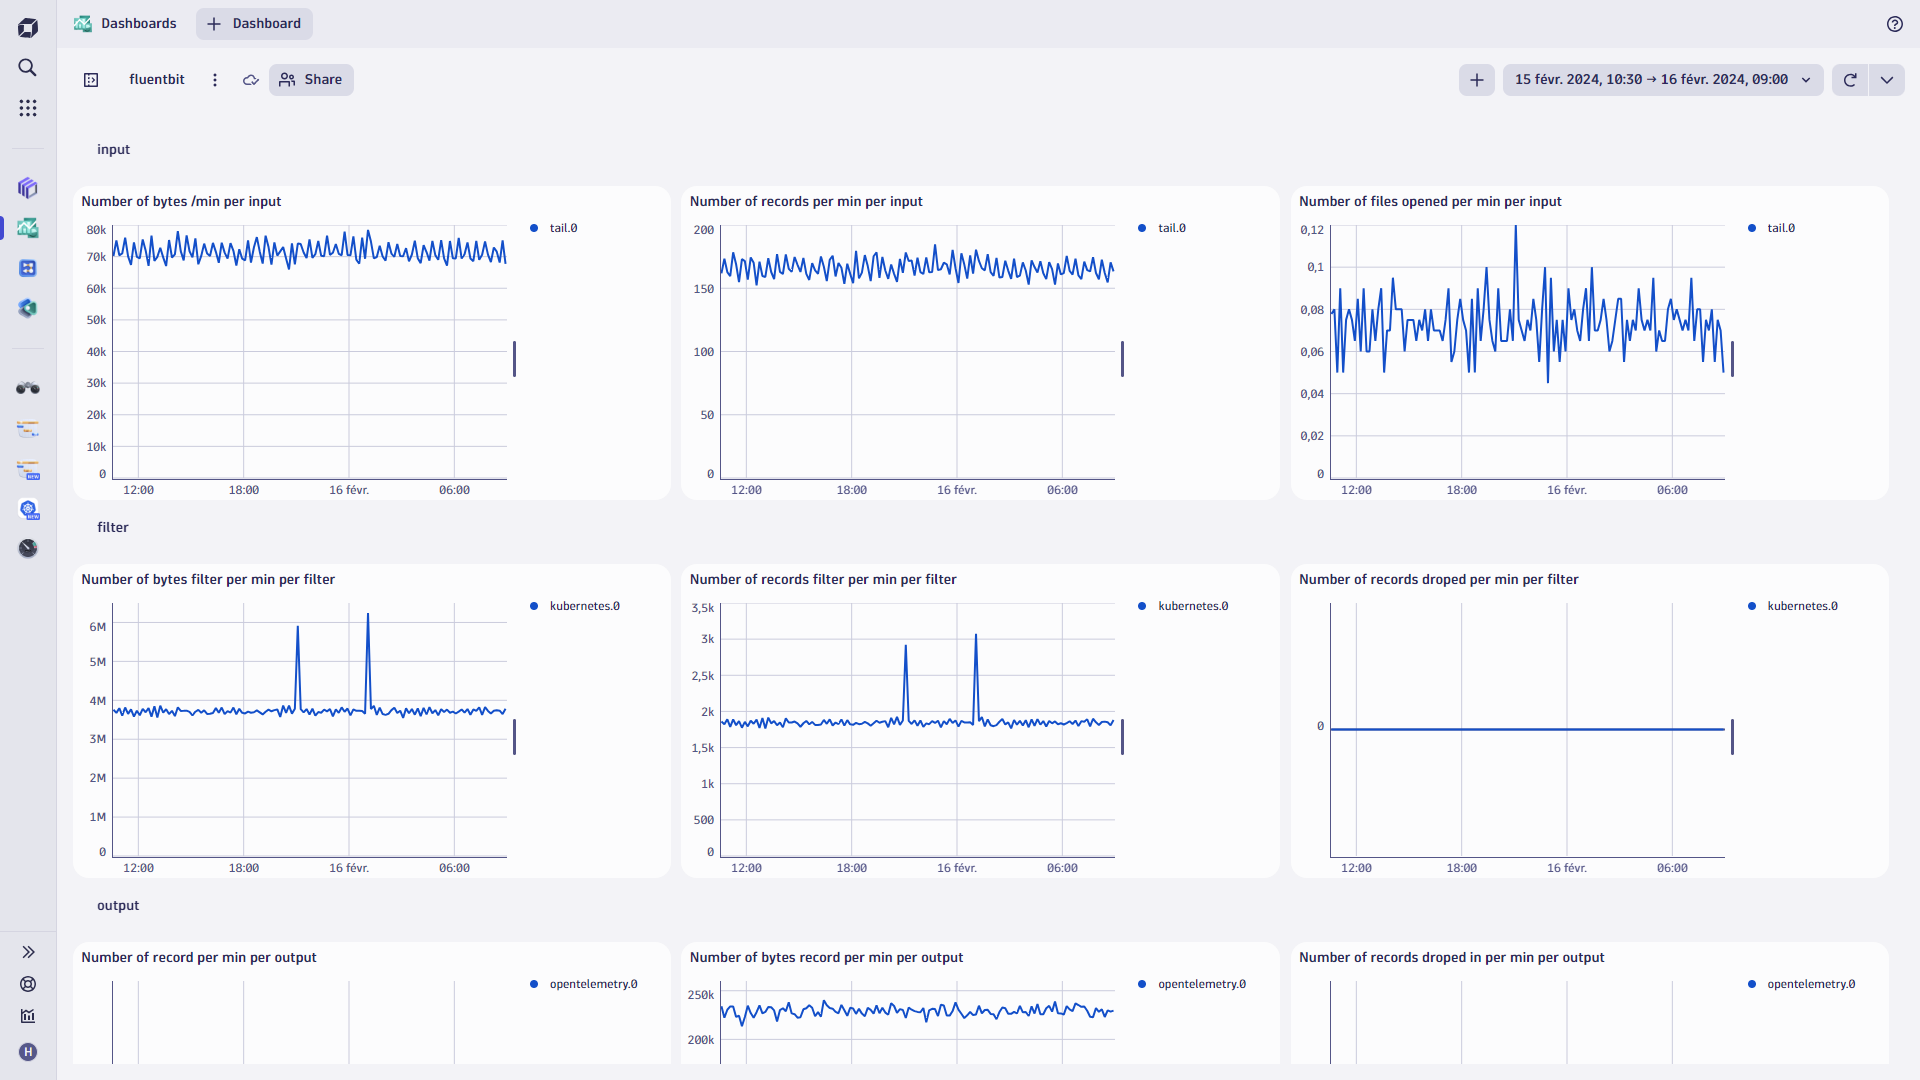
An overview like this can help you see if you’re losing data. For example, “I’m receiving 100 metrics, but only 30 are being outputted, which means I am losing 70% of my data.” Is this intentional? Are there a lot of retries? Retries could be the cause of this issue.
In the dashboard, the Fluent Bit logs are very telling. The logs are rich in information and can help you identify issues that might cause Fluent Bit to be unstable. For example, you can see if there is a major difference between the data being sent into Fluent Bit and how much arrives in Dynatrace.
Conclusion
In this blog post, we delved into the latest updates in Fluent Bit 3.0 and outlined some best practices for leveraging its capabilities effectively within your observability pipeline.
Learn more about Fluent Bit 3.0 on this YouTube video created by Henrik: Fluent Bit 3.0 Observability: Elevating Logs, Metrics, and Traces!


Looking for answers?
Start a new discussion or ask for help in our Q&A forum.
Go to forum