
In this article, we will be talking about the Sphinx search engine and how to use it to install it on the Windows operating system.
This is the first article in the “Sphinx Search Engine” series, where we will explain how to install and use this search engine to create full-text indexes over relational databases (SQL Server).
Introduction
Sphinx (SQL Phrase Index) is a standalone full-text search engine that provides efficient search functionality to third party applications, especially SQL databases. This search engine was developed in 2001 by a Russian developer named Andrew Aksyonoff to guarantee a (1) good search quality, (2) performed at high speed (3) with a low resource consumption (Disk IO, CPU). It can be integrated with scripting languages such as Python and Java.
The Sphinx search engine has its own data source drivers that are used to interact with different database management systems. We must specify the driver we need in the configuration files.
In a research paper published in 2017 by a group of researchers at Moscow Technological University, a quick comparison is made between four popular search engines (Sphinx, Apache Solr, ElasticSearch, and Xapian). The result (shown in the table below) shows that the Sphinx search engine has the fastest indexing speed (4.5 Mb/sec) and a very fast search speed (7/75 ms).
| Sphinx | Solr | Elasticsearch | Xapian |
Indexing speed (Mb/s) | 4.5 | 2.75 | 3.8 | 1.36 |
Search speed (ms) | 7/75 | 25/212 | 10/212 | 14/135 |
Index size (%) | 30 | 20 | 20 | 200 |
Realization | Server | Server | Library | Library |
Interface | API, SQL | Web-service | API | API |
Search operators | Boolean, prefix search, exact phrase, words near, ranges, word order, zones | Boolean, prefix search (+ wildcards), exact phrase, words near, ranges, approximate search | Boolean, prefix search (+ wildcards), exact phrase, words near, ranges, approximate search | Boolean, prefix search, exact phrase, words near, ranges, approximate search |
Table 1 – Search engines comparison
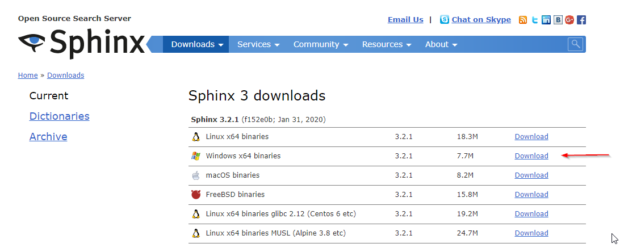
Downloading Sphinx search engine
First of all, we should download the latest version (for now, the latest version is 3.2.1) of the Sphinx search engine from the following link.

Figure 1 – Sphinx download link
Note: In this guide, we will use “E:\Sphinx” as the installation directory.
After downloading the binaries package, we should extract its content (as shown in the image below, we used 7zip as an extraction tool).

Figure 2 – Extracting binaries package
Setting up Sphinx
After extracting the package, we should add a folder called “data” within the extracted directory to store indexes. Then we should create three folders called “index”, “log”, and “binlog” within the created “data” directory.

Figure 3 – Extracted directory

Figure 4 – Adding “data” directory

Figure 5 – creating the index, log and binlog folders
It is good to know that Sphinx has two primary services:
- Indexer: This service is used to build full-text indexes. By default, Sphinx read the source tables from the configuration file located in “<installation directory>\etc\sphinx.conf”
- Searchd: This is the daemon used for searching the created indexes. It requires a client to access the Sphinx API
First, we should create a windows service to run the Searchd daemon. To do this, we can use the following command from the Windows command prompt:
E:\Sphinx\sphinx-3.2.1\bin\searchd –install –config
E:\Sphinx\sphinx-3.2.1\etc\sphinx.conf –servicename SphinxSearch

Figure 6 – Creating Windows service via command prompt
To check that windows service is created successfully, we can go to Services and check if the SphinxSearch service is added.

Figure 7 – SphinxSearch windows service created
Note that before setting up the Sphinx configuration file, this Windows service cannot be started.
To configure Sphinx, we should create the “Sphinx.conf” file within the “E:\Sphinx\sphinx-3.2.1\etc” directory. Then we should first add the following lines:
searchd
{
listen = 9306:mysql41
pid_file = E:/sphinx/sphinx-3.2.1/data/searchd.pid
log = E:/sphinx/sphinx-3.2.1/data/log/log.txt
query_log = E:/sphinx/sphinx-3.2.1/data/log/query_log.txt
binlog_path = E:/sphinx/sphinx-3.2.1/data/binlog/
}
The listen option specifies that Sphinx will use port 9306 and the MySQL protocol. Using the MySQL protocol allows you to connect to Sphinx as a regular MySQL database. The pid_file setting specifies the location of the .pid file that is used internally. Setup log and query_log indicate the location of the log files, which record all the events. The binlog_path setting specifies the location of the files that can be used to restore real-time index data after a failure.
To start Sphinx, we must at least create one index in the configuration file. In this article, we will define a fake real-time index by adding the following lines:
index fake_index
{
type = rt
path = E:/sphinx/sphinx-3.2.1/data/index/fake_index
rt_field = fake_field
}
Now, let’s try to use the indexer service to build the indexes using the following command:
E:\Sphinx\sphinx-3.2.1\bin\indexer –all –config
E:\sphinx\sphinx-3.2.1\etc\sphinx.conf –rotate –print-queries
If you are using the Sphinx version 3.2.1 while executing the command above, you may encounter the following error:
“The code execution cannot proceed because ssleay32.dll was not found”

Figure 8 – Indexer service throwing an exception
This error cause is that there are three missing assemblies in this release. To solve this problem, you can download a previous release (3.1.1) and copy the following assemblies from the bin directories:
- libeay32.dll
- msvcr120.dll
- ssleay32.dll
After copying these assemblies, if we try to re-execute the command above, we will receive the following message (as shown in the image below)
“FATAL: no indexes found in config file”
Which means that the indexer is started successfully, but it didn’t find a real index.

Figure 9 – Indexer service output message
Now, if we try to start the SphinxSearch Windows service, it will start successfully.
Some useful commands
The following table contains some important commands:
Command | Description |
E:\Sphinx\sphinx-3.2.1\bin\searchd -h | The Searchd tool help command, it is used to see all available options |
E:\Sphinx\sphinx-3.2.1\searchd.exe –config E:\Sphinx\sphinx-3.2.1\etc\sphinx.conf | Start the Searchd daemon using the specified configuration file |
E:\Sphinx\sphinx-3.2.1\bin\searchd.exe –config E:\Sphinx\sphinx-3.2.1\sphinx.conf –logdebug | Start the Searchd daemon using the specified configuration file with logging enabled |
E:\Sphinx\sphinx-3.2.1\bin\searchd -–servicename SphinxSearch –delete | Delete the existing SphinxSearch Windows service |
Table 2 – Important Sphinx commands
Connecting to Sphinx using MySQL console client
Since Sphinx supports the MySQL protocol, so we can use the MySQL console client to connect to Sphinx and execute commands.
First, we need to download and install the MySQL database engine on the local machine. You can download the MySQL community server from the following link.
After installing MySQL Server, open the Windows command line and go to the MySQL binaries directory (in this example the directory is “C:\Program Files\MySQL\MySQL Server 8.0\bin”), and use the MySQL client to connect to localhost port 9306 (specified in the Sphinx configuration file) using the following command:
mysql -h 127.0.0.1 -P 9306

Figure 10 – Connecting to Sphinx using MySQL client
As shown in the image above, the server version mentioned in the command prompt output is the Sphinx search engine version (3.2.1-dev (commit f152e0b8)), which means that the connection is established successfully.
Now, let’s try to execute the “show status” command to view the server status; the result is as shown in the image below:

Figure 11 – Executing show status command
Online Resources
The downside of the Sphinx is that it does not have sufficient online resources. There are two main resources where you can get useful information:
- The official documentation: Where all Sphinx features and tools are explained
- SphinxWiki: This page contains a lot of Sphinx related topics and resources
- Introduction to search with Sphinx book: A concise introduction to Sphinx that shows how to use this tool to index data and provide fast results to both simple and complex searches
Conclusion
In this article, we talked about the Sphinx search engine and why it is developed. Then, we explained how to download and set up this tool on Windows. Finally, we illustrated how to use the MySQL client console to connect to the Sphinx engine.
In the next article in this series, we will talk in detail about Sphinx configuration files, and we will explain how to use it to build full-text catalogs from SQL Server databases.
Table of contents
| Getting started with Sphinx search engine |
| Building full-text indexes using the Sphinx search engine |
| Manticore search: a continuation of the Sphinx search engine |

Besides working with SQL Server, he worked with different data technologies such as NoSQL databases, Hadoop, Apache Spark. He is a MongoDB, Neo4j, and ArangoDB certified professional.
On the academic level, Hadi holds two master's degrees in computer science and business computing. Currently, he is a Ph.D. candidate in data science focusing on Big Data quality assessment techniques.
Hadi really enjoys learning new things everyday and sharing his knowledge. You can reach him on his personal website.
View all posts by Hadi Fadlallah
- An overview of SQL Server monitoring tools - December 12, 2023
- Different methods for monitoring MongoDB databases - June 14, 2023
- Learn SQL: Insert multiple rows commands - March 6, 2023