Using open source tools to stress test video streaming at scale
In this post, I want to share something that we have been working on with BlazeMeter for several years. In this project, we had the opportunity to contribute to the open source code of JMeter, making this load testing tool capable of simulating load in video transmission protocols and thus, be able to execute performance tests.
As we have also been able to use this tool in some of our projects, we have some tips that will help you prepare and execute performance tests on HLS (the protocol that we’re working on).
I want to especially thank Roger Abelenda, Luis Martínez and Sebastián Lorenzo from Abstracta for their contribution to this article. I hope this post can be useful, and serve as a guide for this practice.

Any type of system that will be used by multiple users, but in particular video streaming, needs to be tested to minimize any risk before launch. In the rest of the post, I will focus specifically on these tests.
If you want to know more about when you should start performance testing, at what levels, with what load, etc, you can check out some of our other articles:
- Why Performance Testing is Necessary
- When is the Best Time to Start Performance Testing?
- How to Make a Performance Test Plan
Before beginning, remember that as in any performance test, we need to simulate the interaction between the client and the server, so in this case, we’ll concentrate on the HLS (HTTP Live Streaming) protocol.
How does the HLS protocol work?
You can find Apple’s explanation of the HLS protocol in this article. Basically, the protocol has certain steps to follow, which I’ll explain below. Although the protocol is designed for three variants, On Demand, Live, and Event, I’ll focus on the “On Demand” example. Once you have understood one, it’s very easy to understand the others.
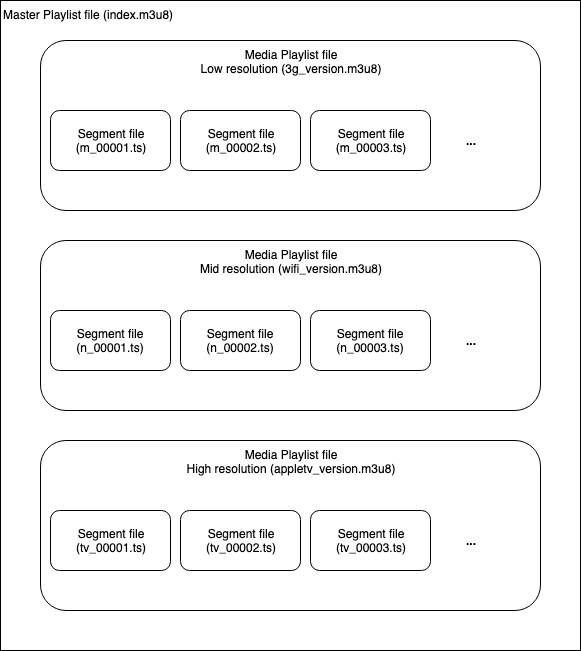
From the Server Side (Encoder)
The audio or video that will be transmitted can be played at different levels of quality, bitrates and resolutions. Each version is called a “variant.” So, on the server side we have different variants of the same video, with different resolutions. In the example seen in the image above, we have the same video in three variants, one in low resolution designed for a 3G connection (this is just an example to help understand the protocol better), another with better resolution for when the viewer is connected to WiFi, and a third variant with the highest resolution for when someone watches the video on an AppleTV (since this protocol was created by Apple, we will put this as the example).
The different variants are divided into small segments by the encoder (Media Segment Files). In other words, each video is going to be split into many pieces and saved in a “.ts” extension file.
The encoder creates a Media Playlist for each variant with the URLs of each segment. This would be like the index of the segment files, so that it’s possible for the client to know how to assemble the video from all those segments.
The encoder also creates a Master Playlist File with the URLs of each Media Playlist. This way, the client will know which variants are available (the available resolutions to download).
From the Client Side (Video or Audio Player)
The Master Playlist is downloaded, and with it come the different Media Playlists with the variants (different video qualities, bitrates and resolutions), which contain the references to the segments and the corresponding videos.
The segments indicated by the Media Playlist are downloaded in real time and in the case of live video or event, the Media Playlist is downloaded periodically to check if there are new segments that have been added.
Here’s the Step-by-Step Protocol
Below, you’ll see how a message flow would be like, when playing a video from a browser. This is a simple example so you can see the step by step clearly and finally understand it.
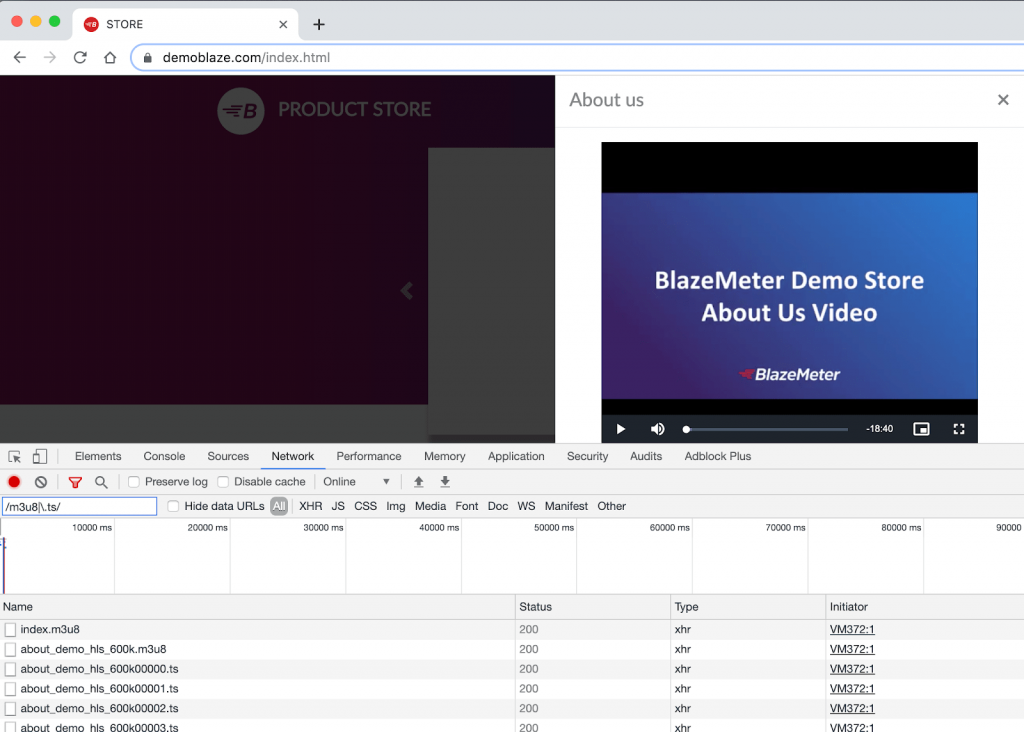
On the DemoBlaze site (www.demoblaze.com), go to the ¨About us¨ section, where you’ll find a video. This is the URL: https://hls.demoblaze.com/index.m3u8
That is the Master Playlist. If you access that URL, an m3u8 extension file will be downloaded, whose content is as follows:
#EXTM3U
#EXT-X-STREAM-INF:PROGRAM-ID=1,BANDWIDTH=8674000,RESOLUTION=1024×576,CODECS=”avc1.4d001f,mp4a.40.2″
about_demo_hls_2M.m3u8
#EXT-X-STREAM-INF:PROGRAM-ID=1,BANDWIDTH=7633000,RESOLUTION=960×540,CODECS=”avc1.4d001f,mp4a.40.2″
about_demo_hls_1-5M.m3u8
#EXT-X-STREAM-INF:PROGRAM-ID=1,BANDWIDTH=3733000,RESOLUTION=640×360,CODECS=”avc1.4d001f,mp4a.40.2″
about_demo_hls_1M.m3u8
#EXT-X-STREAM-INF:PROGRAM-ID=1,BANDWIDTH=2624000,RESOLUTION=480×270,CODECS=”avc1.42001e,mp4a.40.2″
about_demo_hls_600k.m3u8
These are basically the descriptions of the variants. The player can automatically choose or give the user the possibility to indicate what type of variant he or she wants to download (a video in high resolution or one of low quality, which would be convenient if he or she has a bad internet connection). Imagine then that user chooses to download the lower quality option, which would be the last one (480 by 270 resolution). If you look at the Master Playlist file, the URL to the corresponding Media Playlist would be the following: https://hls.demoblaze.com/about_demo_hls_600k.m3u8 and the content (trimmed) would be as follows:
#EXTM3U
#EXT-X-VERSION:3
#EXT-X-MEDIA-SEQUENCE:0
#EXT-X-ALLOW-CACHE:YES
#EXT-X-TARGETDURATION:13
#EXTINF:12.046444,
about_demo_hls_600k00000.ts
#EXTINF:9.000000,
about_demo_hls_600k00001.ts
#EXTINF:9.000000,
about_demo_hls_600k00002.ts
#EXTINF:12.000000,
about_demo_hls_600k00003.ts
#EXTINF:9.000000,
…
…
…
about_demo_hls_600k00110.ts
#EXTINF:10.133333,
about_demo_hls_600k00111.ts
#EXT-X-ENDLIST
This contains the list of segments of a 13-second video. The client is the one who will ask for these segments one by one and will know what to do with them.
To see it, go to the “About Us” section of the Blazedemo site, then go to the Chrome developer tools (F12 key), and on the Network tab, filter with the following regular expression:
/m3u8|\.ts/
This way, you’ll only see the requests to Master Playlists, Media Playlists (those ending in m3u8) and the segments (ts extensions).
How does the JMeter Plugin work?
You can find a complete guide to HSL in the repository where the plugin’s source code is or in this BlazeMeter blog post written by Andres Favre, when he was part of our development team as a tester.
The plugin is very simple, there is only one request to the Master Playlist and then all the rest is automatic, just as a video player would be. It’s not necessary to do all the requests separately or to parse the answers to see what requests should be made next. The protocol logic is encapsulated in a single JMeter Sampler.
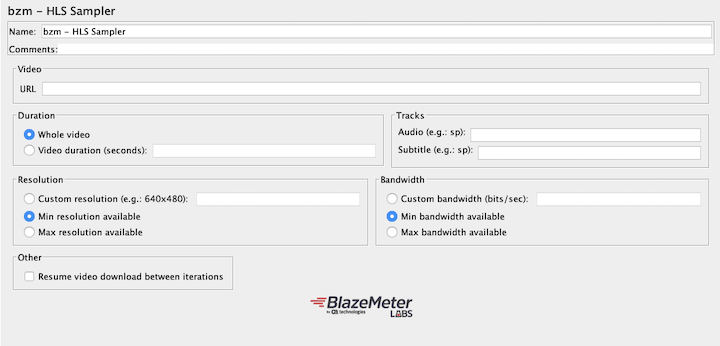
After installing the plugin, you just have to define the URL of the Master Playlist and then indicate some parameters to see which video you want to simulate its reproduction (the one that has the maximum quality, the minimum, a specific one, for how long, etc.).
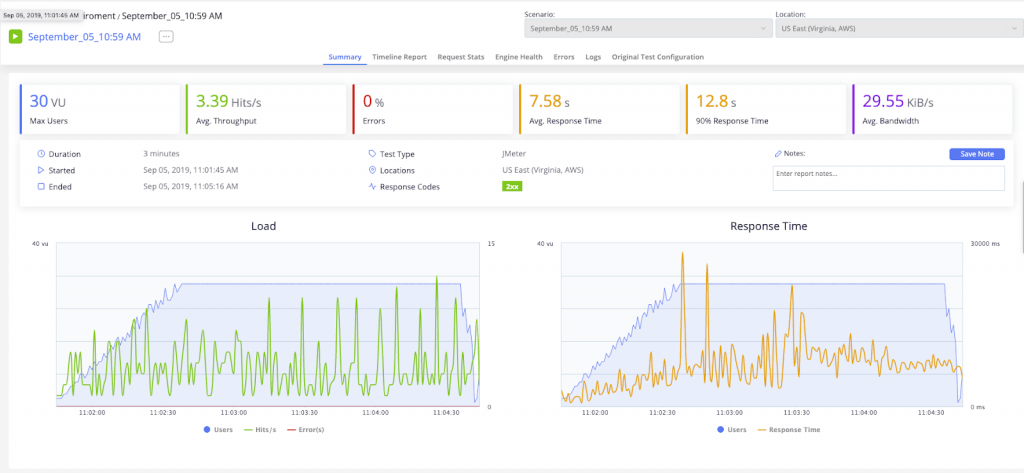
When running a test with this plugin, this is what the result would look like in JMeter:
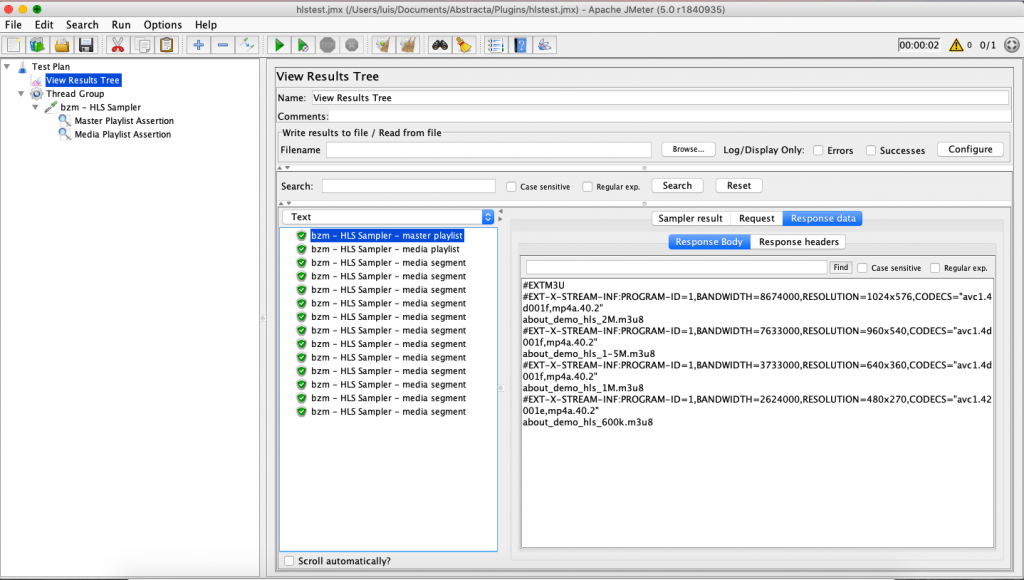
You can see that the first request is to the Master Playlist, the second to the Media Playlist (this depends on what we have configured in the sampler) and then the sequence of segments begins.
This is what the result would look like in BlazeMeter:
Now that we covered how the HLS protocol and plugin work, here are some considerations to keep in mind when putting together and running our tests:
To Keep in Mind When Defining the Script
You have to know what test you want to run and for that, it’s important to think about the variables: how many concurrent users there will be, if there is a ramp-up, and if so, for how long, what flows over the system, different accesses, data that could vary, etc. It’s also important to know what type of video you want to download, that is, an event, live or VOD (video on demand). In any case, you have the possibility to indicate the duration of the video you want to download, which will basically determine the duration of the test.
To assemble the script, you can follow a step-by-step sequence similar to the one I explained earlier in the Blazedemo example, although you can also use the Chrome extension to record scripts in JMeter and Taurus. Starting 11 minutes into this video, you can see how to use this extension.
As always, it’s essential to add assertions to these tests because it’s not enough to check if the HTTP response code is correct (something that JMeter does automatically). It’s better to add some validations to the answers to make sure you are getting what you expect. As there isn’t much to do with the segments, since the content is binary, the content options that you can validate are only the content of the Master Playlist and Media Playlist.
Another thing that is extremely useful is using the HLS sampler within a transaction controller which allows you to obtain the response time of the entire execution and thus be able to compare the duration of the actual download and the video time that is requested to download.
Things to Remember When Defining the Scenario
- If it’s possible to access the video from different locations around the world, do the tests from different locations as well (Blazemeter allows you to easily configure the distribution of the tests from different places around the world).
- Try different scenarios, different user loads, peaks, and stress.
- Define if you want to simulate with or without HTTPS.
- Are there load balancers? Are CDNs used? Our suggestion is to test with “nothing in the middle” and also test the entire infrastructure as it would be received by the user. For this, you probably need to leave the URL as a parameter in your script so that it’s possible to configure from the execution in BlazeMeter which environment you want to stress.
It’s always important to calibrate the test. That is, to run several tests to determine how many VU (virtual users) it’s possible to run from a single BlazeMeter engine, or from a single machine if you run the test locally. Typically JMeter can execute more than 500 threads from the same machine, but this depends a lot on the script, and of course, on the characteristics of the machine, so it’s best to test it. It’s also important to keep an eye on the health of the machines from where you run the test, since if they were to become saturated, the results wouldn’t be reliable.
Important Aspects to Consider When Viewing and Analyzing the Results
- If you set it to download 10 seconds of video, the total time of the sampler should be less than 10 seconds, otherwise instances of cutting out could occur in the video when played by users. This is a simple way to verify if the video will have cut out or not.
- It’s important to control the response times of the segments and compare the results of different tests. If you run a test with few users, it will help you to see the response time of the segments in low load conditions and you’ll be able to use those measures as a baseline.
- Control the response times of the Media Playlists and Master Playlists.
- While the test is playing, access the video as the real client (through the web or with a native app). If it’s possible for several people to connect at the same time, more data will be obtained. There you will get the real user experience when the system is loading. We always use this strategy in performance tests, even in simpler cases, such as only accessing a web page. We usually call it the “witness user.” In video streaming applications, this strategy becomes much more important.
At the end of this post by Konstantine Firsanov, you’ll find out how to add a post-processor to obtain certain metrics that will allow you to analyze the user experience when using the HLS Sampler.
Load Testing Streaming Services Just Got Easier
The HLS plugin for JMeter is an open source contribution we’ve made thanks to the support of BlazeMeter.
Although our team continues to work on this project, all contributions are welcome! You can find this plugin and many more in BlazeMeter’s Github repository.
Watch this HLS Plugin Webinar
Our CTO, Roger Abelenda (who helps work on our JMeter plugins development team), demonstrates the HLS plugin and shares some good practices to keep in mind when running performance tests on video streaming systems:
Recommended for You
Case Study: Load Testing a Video Streaming Service for 85,000 Concurrent Viewers
Expert Roundup: Software Testing Trends 2019

TOP 10 Best Performance Testing Tools in 2023
Performance testing tools are becoming more and more critical for accurately predicting system capacity and building quality software. Keep reading and find out our TOP 10 best Performance Testing Tools, including open-source platforms and proprietary testing tools. Performance testing reveals a system’s behavior under various…
A leader for each project, key for the creation of quality software
There are many companies that wish to avoid the costs involved in having a testing leader in their projects. In this article, Federico Toledo, Alejandra Viglietti, and Alejandro Berardinelli explain why this role is a priority for the creation of quality software and the economic…
